Achieving the Knotless Braid Boho Style
In the dynamic world of fashion and beauty, trends come and go, but every so often, a style emerges that captures the hearts and
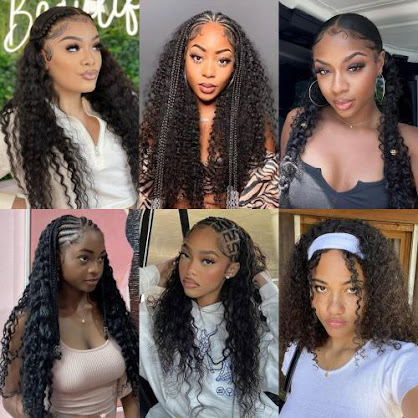
imaginations of individuals seeking a fresh, unique look. The current buzz is
all about the "Knotless Braid Boho Style," a trend that has taken the
hairstyling scene by storm. Let's delve into why this trend is making waves and
why it's the go-to choice for those seeking a blend of comfort, creativity, and
bohemian allure.
The knotless braid boho style's meteoric rise can be
attributed to its perfect marriage of two essential elements: comfort and
aesthetics. Unlike traditional braids that can sometimes lead to discomfort due
to tight knots at the scalp, knotless braids start with a gentle, tension-free
technique. This shift in braiding approach allows individuals to rock their
braids for extended periods without the associated discomfort, making it an
ideal choice for a variety of occasions.
The bohemian or boho style has always been associated with a
carefree, artistic spirit. In recent times, as the world gravitates towards a
desire for individual expression and unconventional beauty, the boho aesthetic
has gained even more traction. The knotless braid, with its relaxed and
effortlessly chic appearance, aligns perfectly with the boho vibe. It's no
wonder that fashionistas, celebrities, and trendsetters are turning to this
style to infuse their look with an air of bohemian charm.

Here’s how to create effortless Boho Vibes: A Step-by Step Guide
Step 1: Parting and Sectioning
Begin by deciding on your desired parting. A middle part or a slightly off-center part works best for that boho vibe. Use your wide-tooth comb to create the part, and then section off the front portion of hair that you'll leave loose for framing your face.
Step 2: Preparing for Braiding
- Take a small section of hair near your parting and divide it into three equal strands. This will be the starting point of your knotless braid.
- Instead of starting with a knot, begin by weaving the strands over each other without any tension. This technique reduces strain on your scalp and hair.
Step 3: Braiding
- As you continue braiding, incorporate additional hair from the sides into each strand as you weave downwards. This creates the gradual widening effect that characterizes knotless braids.
- Keep the tension gentle as you add hair to each strand. This ensures a comfortable braid that won't pull at your scalp.
Step 4: Adding Boho Accents
- Once you've braided to your desired length, you can enhance the boho vibes by adding decorative elements. Thread colorful ribbons, beads, or small flowers through the braid for a touch of whimsy and individuality.
- Remember, the boho aesthetic embraces imperfection, so feel free to let some strands of hair fall loose for that carefree look.
Step 5: Securing the Braid
- When you've reached the end of your braid, secure it with a hair elastic that matches your hair color or use a clear elastic for an invisible hold.
- Gently tug on the sides of the braid to create a slightly undone appearance. This adds volume and texture to the style.
Step 6: Repeating the Process
- Repeat the braiding process on the other side if you want a symmetrical look.
- For a more dynamic look, you can alternate between different sizes of braids, mixing thin and thick sections.
Step 7: Final Touches
- Use your fingers to gently pull apart sections of the braid, creating a fuller appearance.
- If desired, you can lightly mist the braids with a flexible hold hairspray to ensure they stay in place while retaining a natural look.


Comments
Post a Comment